Emailing Visuals
Arcadia Enterprise enables you to share existing visuals with other users.
Developer Note. To use this feature, it must first be enabled by an Admin user through the Site Settings interface, as described in Enabling and Customizing Email Settings.
Follow these steps to email a visual of your choice. This can be accomplished either from edit or view mode.
In the top right corner, click Email.

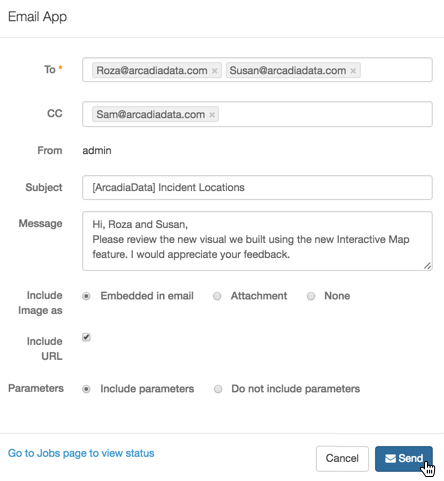
- The Email App window modal appears.
Enter necessary information in the Email App:
- In the To text box, enter the valid email addresses of the primary recipients of the message.
- In the CC text box, enter the valid emails of other recipients.
- In the Subject text box, change the title of the email. Note that by default, the subject is the prefix specified when enabling email site-wide, as described in Managing Custom Styles, plus the title of the visual. In our case, the subject is [ArcadiaData] Incident Locations.
- Enter the text of the email.
- For Include Image options, choose either Embedded in email (default), Attachment, or None.
- Select or unselect Include URL, to include the URL of the visual in the email.
- For visuals that have parametrized fields on their shelves, in the Parameters you can chose either to Include parameters (default), or Do not include parameters.
- You may choose to see the list of pending emails by clicking the link Go to Jobs page to view status. Note that you can access this page at any time, at
http://[host_ip:port]/arc/jobs/adminemaillog. - Click Send.
Emailing a Visual - The system notifies the user that an email is being prepared (the notification is on a blue background). After it sends the email, it shows a success message (the notification is on green background).
We recommend that you send test emails to yourself to ensure that they are formatted as you would expect.