Emailing Visuals and Dashboards Based on a Schedule
You can use the Email interface to schedule regular emails of visuals and dashboards.
Follow these steps to schedule emails of visual or dashboard. This can be accomplished either in Edit mode, or in View mode. We recommend that you learn about Adding Job Parameters to Scheduled Emails to customize alerts. After you finish, verify that the email is set up correctly; see Checking Scheduled Email Jobs.
- See the initial steps described in Emailing Visuals and Dashboards.
- In the Email Visual/Dashboard Visual modal, select the option Schedule Email.
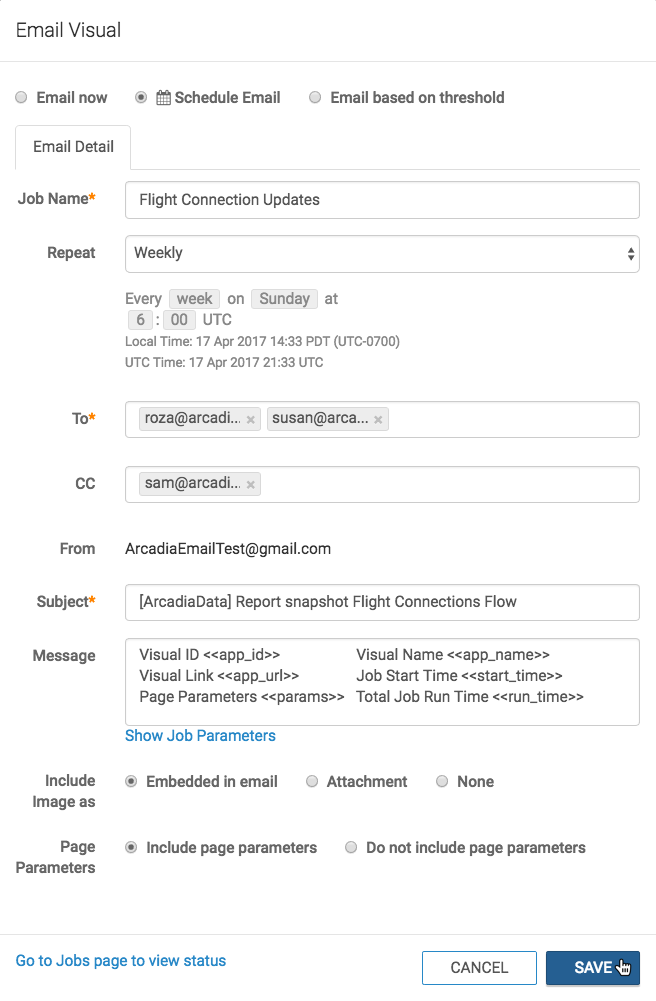
In the Email Detail tab, enter the following information.
- In the Job Name text box, enter the name of the scheduled job. We are using Flight Connection Updates.
-
In the Repeat field, select an existing schedule interval, such as Hourly (default), Daily, Every Weekday, Weekly, Monthly, Quarterly, or any existing custom schedule.
You can also Create New Schedule (this is available to Admin users only). See Specifying Custom Intervals for Scheduled Emails.
- In the To text box, enter the valid email addresses of the primary recipients of the message.
- In the CC text box, enter the valid emails of other recipients.
- The value of the From field is configured on the Site Settings interface; see Enabling and Customizing Email Settings.
-
In the Subject text box, you can change the title of the email.
Note that by default, the subject is the prefix specified when enabling email site-wide, as described in Enabling and Customizing Email Settings, plus the title of the visual. In our case, the subject is [ArcadiaData] Report snapshot Flight Connections Flow. Also, see Adding Job Parameters to Scheduled Emails.
-
Enter the text of the email. Also, see Adding Job Parameters to Scheduled Emails.
-
For Include Image as options, choose one of these:
- Embedded in email (default)
- Attachment
- None, which is fastest; choose it when you require only the URL of the visual and its parameters.
-
For visuals that have parametrized fields on their shelves, in the Parameters you can chose one of these:
- Include page parameters (default)
- Do not include page parameters, which includes default picklist parameters.
- Click Save.
- The system notifies the user that the schedule was created successfully.
- To verify that everything is correct, see Checking Scheduled Email Jobs.
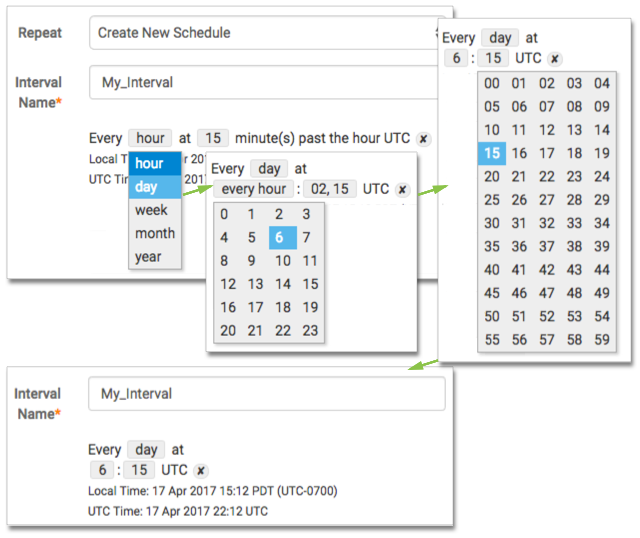
Specifying Custom Intervals for Scheduled Emails
This feature is available only to users with administrative privileges.
The Interval Name field contains a date/time picker that enables
users to set a valid interval specification by selecting the interval
(hour, day, week,
month, or year), and then specifying the rest of
the date/time elements at progressively higher granularity. For example, if the initial
selection is for day, the rest of the sequence specifies
hour and minute.
Note that it is possible to select multiple values for day, hour, and minute parameters.
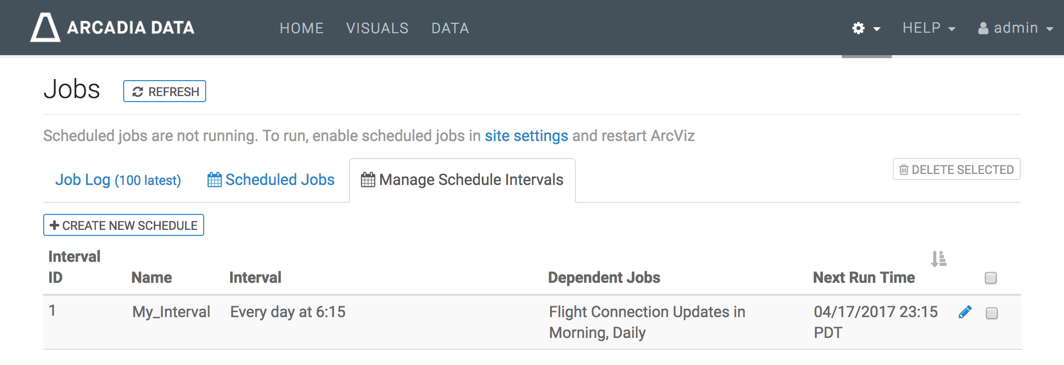
Notice that the when you navigate to the Jobs interface and click the Manage Schedule Intervals tab, the new interval appears there, and can be edited or deleted, just like other schedule intervals.
Adding Job Parameters to Scheduled Emails
Click the Show Job Parameters link. With your cursor in either the Subject or Message field, select the relevant parameters, and Arcadia Enterprise automatically adds them to body of that field.
-
Visual ID/Dashboard ID, as
<<app_id>> -
Visual Name, as
<<app_name>> -
Visual Link, as
<<app_url>> -
Job Start Time, as
<<start_time>> -
Page Parameters, as
<<params>> -
Total Job Run Time, as
<<run_time>> - Next Run Time, as
<<next_run_time>> - Interval Name, as
<<run_interval>> - Interval Cron, as
<<run_interval_cron>>
Checking Scheduled Email Jobs
To check that this scheduled repeating email is prepared correctly, see the following steps. You should also review a more detailed description of the Scheduled Jobs interface.
- Open the (administration) menu in top navigation, and select Job Status.
In the Jobs interface, click the Scheduled Jobs tab, and notice that the job you just created is in the list.
We recommend that you click Refresh to ensure that all status updates show.
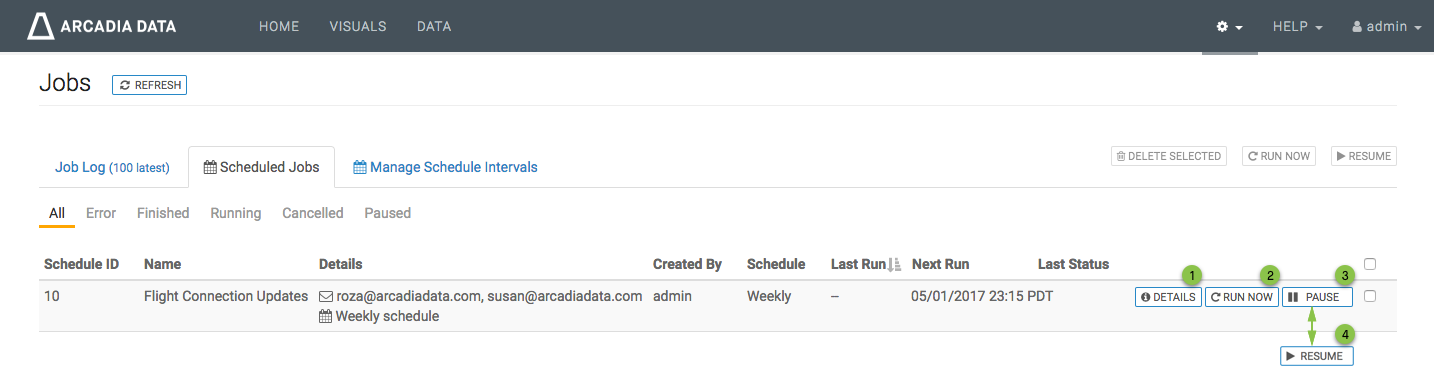
Note some of the actions that you can perform directly on the job:
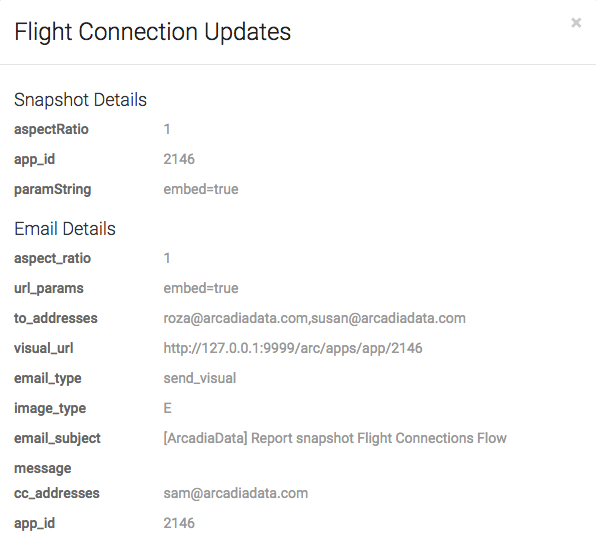
Click Details to see the properties of the scheduled email.
Click Run Now to test the job, or run it off-schedule.
Click Pause to temporarily stop scheduled emails without removing them from the system.
To re-start scheduled jobs, toggle back by clicking Resume.