Visuals Interface
In the Visuals interface, you can initiate a number of operations.
- Start a New Dashboard by clicking New Dashboard.
- Start a New App by clicking New Appp.
- Access standard groupings by clicking on their titles: All or My Favorites.
In the navigation menu, click to open the Workspaces interface. See Working with Workspaces.
Here, you see the default workspaces that all users have: Private and Public.
- Look at the Dashboard Samples that ship with Arcadia Enterprise.
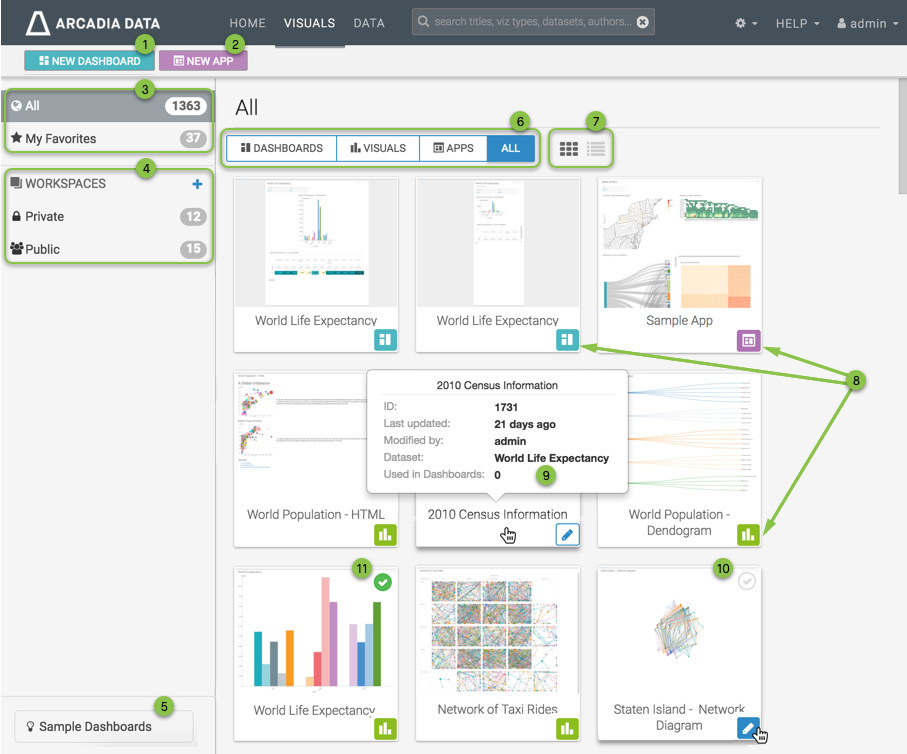
- Switch between viewing Dashboards, Visuals, Apps, or All visual artifacts.
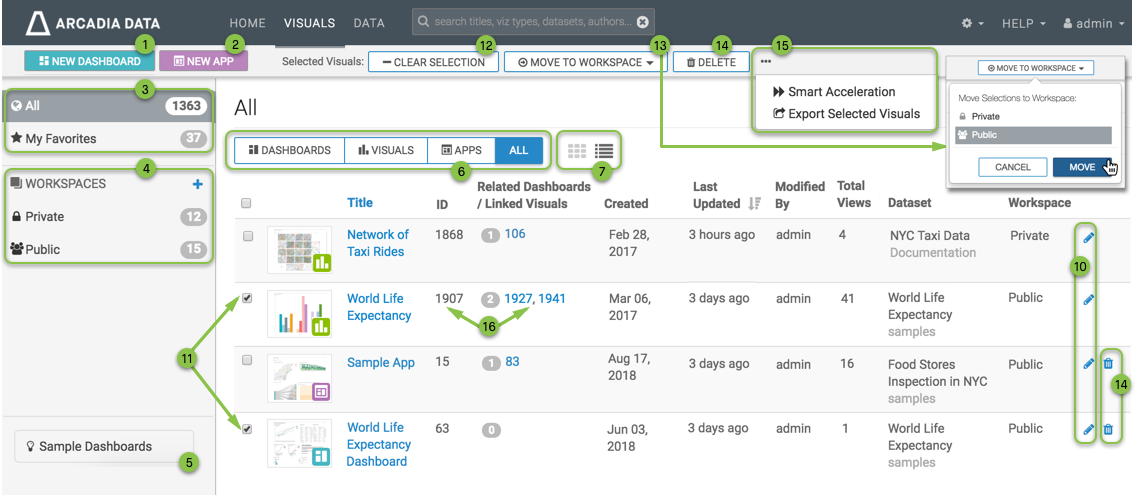
- Switch between Grid View and List View.
- Navigate to a dashboard, visual, or app to view it simply by clicking it. Note that the dashboards are marked using a teal icon in the bottom right corner, the visuals are marked with a green icon, and apps use a purple icon.
- Preview descriptive information about a visual artifact in grid view by hovering over the title until a tooltip appears.
In Grid view, hover over the bottom right corner, and the icon changes to a blue (pencil/edit) icon. Click to open the dashboard, visual, or app in edit mode.
In List view, click the (pencil/edit) icon at the end of the line to edit the dashboard, visual, or app.
-
In Grid view, select and mark visuals and dashboards by hovering over the top right corner and clicking the checkmark.
In List view, you can select and mark visuals, dashboards, and apps simply by marking the selection box that corresponds to the item.
- When you select one or more items, the options for selected visuals appear across the top. Clicking Clear Selection de-selects all visuals and dashboards.
- Clicking Move to Workspace opens a menu for moving the selected items to a new workspace.
Clicking Delete at the top deletes the selected items, after a confirmation.
To delete a single item, click the (trash) that corresponds to it. Note that some items don't have the delete option: this is because they are linked visuals that appear in a dashboard.
- Clicking the Supplemental Menu, marked by the (ellipsis) icon, enables you to use Smart Acceleration, or Export Selected Visuals.
- Note that list view exposes the ID of the visuals and dashboards, and also references the IDs of dashboards where the visuals appear.